Hi, My Yellow Sandbox Readers My name is Whitney and
I am the momma behind the blog
A Mommy's life...with a touch of YELLOW
I feel so honored and am so excited to be guest posting today
I LOVE Abby
Love her blog
I Love her hair ideas and know they are to die for right?!
and I love our friendship
I hope we can all get to know each other a little better

A Mommy's life...with a touch of YELLOW
I feel so honored and am so excited to be guest posting today
I LOVE Abby
Love her blog
I Love her hair ideas and know they are to die for right?!
and I love our friendship
I hope we can all get to know each other a little better

I am a mommy to this crazy little 18 month old adorable little man

and a wife to the love of my life

I live in Salt Lake City, Utah
I change my hair probably more than anyone you know
and get asked if I do hair all the time
(I guess just cuz it is always different...maybe I should)
I have my bachelors in Physical Education and Health Education
and will one day be out there teaching your teenagers
For now I love to keep myself busy with PROJECTS of all sorts
while the hubby is at law school and the babe in napping
everything I do is on a tight budget and when it is cheap but amazing, it is even more exciting
Over at my blog you will find DIY projects, knock offs, Holiday, redoing, chic n' fresh tips,
a little about health, fitness, pinterest loves, recipes, a little about my family,
learning new things and this is all rolled up in my mommy adventures
Now on with the fun tutorial
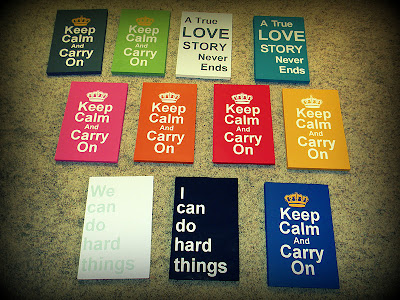
I have been loving the Keep Calm and Carry on plaques
that I have been seeing everywhere
especially on some fun etsy shops
But...I thought instead of buying one I would take a stab at it
and make one for cheaper
I made one...as a trial for FREE
I had everything on hand
then when I decided to make some more
to sell and give as gifts it was about $20 for 12 of them
Sweet deal right!
to sell and give as gifts it was about $20 for 12 of them
Sweet deal right!

These are the supplies you will need:
-A roll of vinyl (or already cute vinyl if you don't have a silhouette)
-A silhouette or cricut or access to one
-Paint (colors of your choice)
-Sponge brushes
-Sand paper
-the MDF board
And anything else your cute, creative self wants to put on it
Make it yours
Make it fit you and your home and the room you want it to go in
Don't be scared to try something new
Here is what I did....

First I got myself a piece of wood
I had this one on hand from another project

for the rest I went to home depot and got
a slab of 3/4 inch thick MDF board
and it cut to 12 inches high and 7 1/2 inches wide
so I got 12 out of one slab
Thanks hubby for cutting the boards for me
I love having a handy hubby it helps a lot

Then I painted it white
This is the color I want the letters
"Keep Calm and Carry On" to be
so I paint that color first
Then you let that completely dry
I know I know I hate waiting to let the paint dry too
I am so impatient when it comes to painting projects
because I just want them to be done!
I just want to see how much I am going to love it
But we all have struggles
and mine is patience

Once the white was completely dry it was time to do the crown
I decided to add a little YELLOW here
So I just painted a small area big enough for the crown to fit
Then you let that completely dry
While the paint was drying I hoped onto my computer
and cut myself come vinyl and a crown
I used the font Arial Bold Size 144
Since I wanted all of this to be painted
with no vinyl
I am only using the vinyl as a stencil
So once it is dry I placed all the vinyl on using transfer tape
to keep it all strait

The next step is to paint over all the other paint and vinyl
the main color that you want your sign to be
I chose Green
for my first one
Then again you put your patience cap on
Then again you put your patience cap on
and wait for the paint to completely dry
I probably put 2 coats of paint on
and then
I let this dry over night

Then ya know what is next!
It is time to peel off the vinyl leaving the white exposed for the lettering
and the crown yellow
Isn't it kinda cool how that works

And the very last step
is to sand the edges, corners and lightly sand the top
I wanted a kind of shabby chic worn look
and sanded the top so the green bled into the white letters a little bit

So all you FAB My Yellow Sandbox Readers
KEEP CALM and CARRY ON!
I gave this baby to my mom as a gift
It matches her room perfect
I also made another for my room in White, yellow and turquoise
and made a bunch as gifts and to sell at a Boutique this weekend
I seriously can't wait to have one up in my room
It matches her room perfect
I also made another for my room in White, yellow and turquoise
and made a bunch as gifts and to sell at a Boutique this weekend

I seriously can't wait to have one up in my room
I want to see it everyday
be reminded to enjoy life
count my blessings
Calm down and just be happy

Remember you can totally make these
and the holidays are coming up
so these would make awesome and unique gifts
If you have any questions never hesitate to email or comment
I hope I have given you the tools and confidence
to be able to make these fun signs
Mix up the color, the sayings and just have fun with it
It really is so much fun and you will love them when you are done
Make sure to check out my blog for more of what I do
Lets be friends :)
Thank you so much Abby for this opportunity!


